This activity starts with an app running on a single EC2 instance in a single availability zone. Then I make it highly available by cloning it and deploying it in an Auto Scaling group behind an Elastic Load Balancer that spans two availability zones.
- Create an image of an existing Amazon EC2 instance and use it to launch new instances.
- Expand an Amazon VPC to additional Availability Zones.
- Create VPC Subnets and Route Tables.
- Create an AWS NAT Gateway.
- Create a Load Balancer.
- Create an Auto Scaling group.
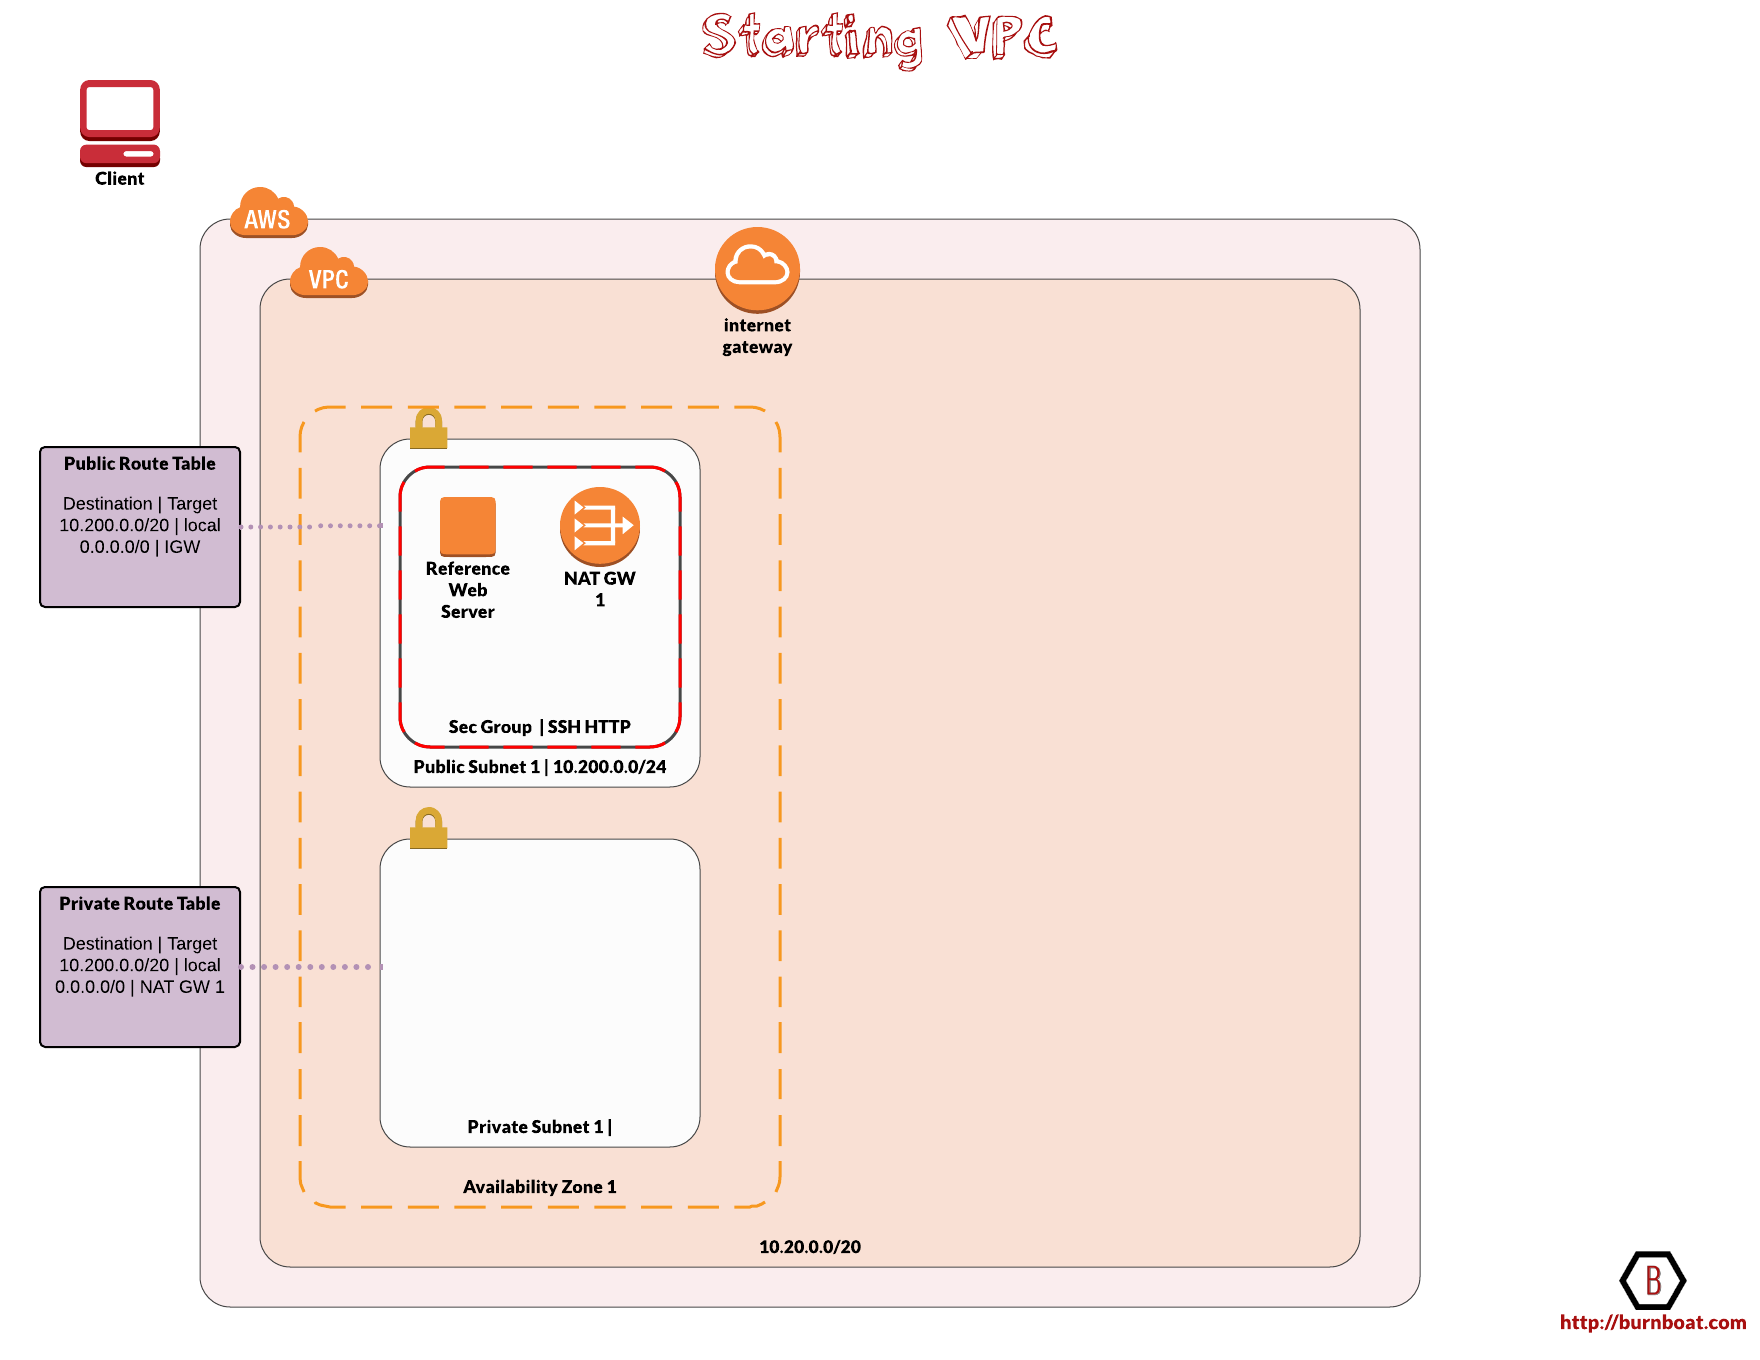
I have a starting state VPC in which I build out a reference app server. Then I build up the primitives towards high availability.
Setting Up The Starting State VPC
The VPC will have a CIDR block of 10.200.0.0/20 giving us an IPv4 range between 10.200.0.0 and 10.200.15.255 (Not all are usable as AWS reserves some)
Subnets
The diagram below highlights the starting state of the VPC.
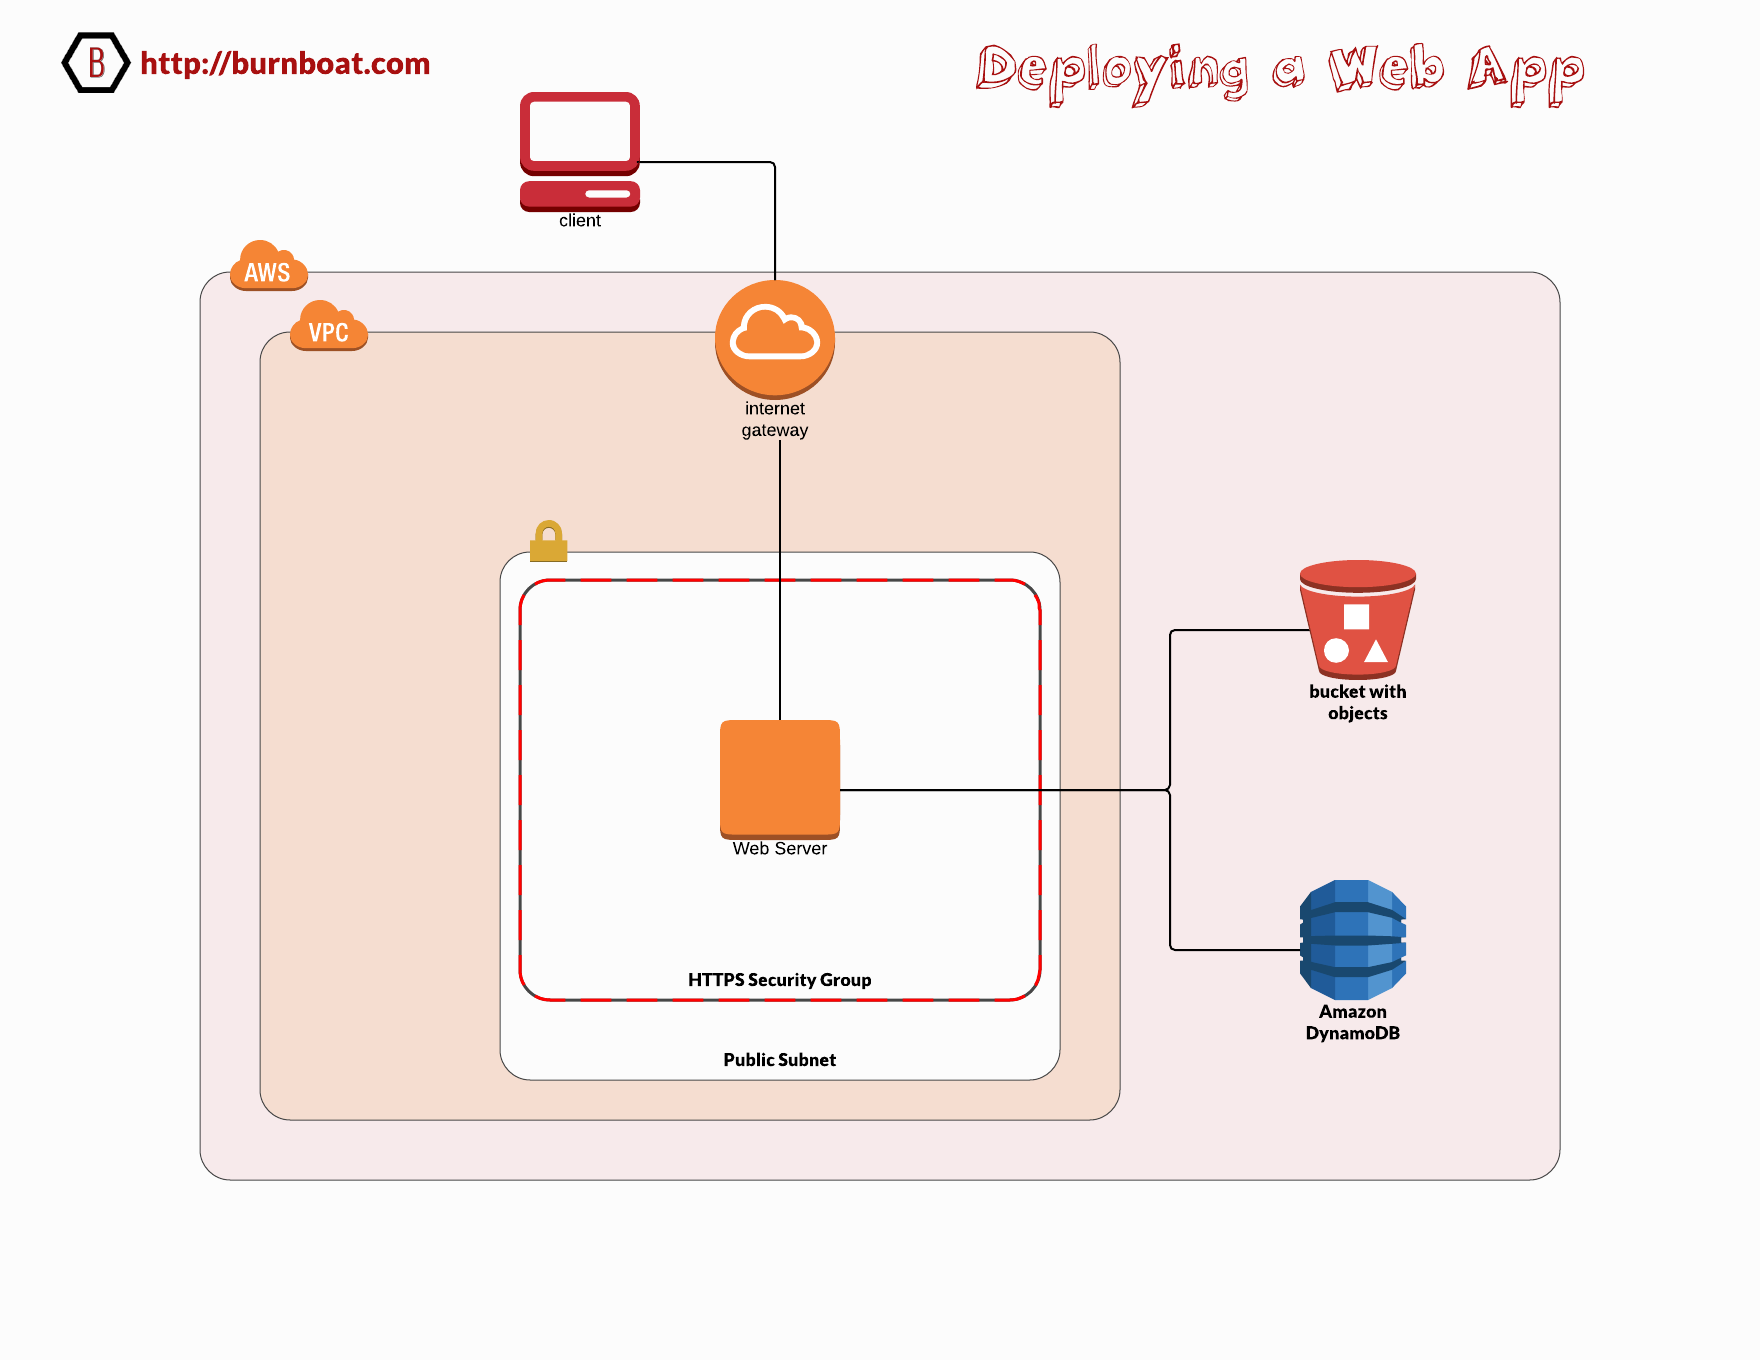
Build a VPC and deploy a web app onto an EC2 instance using a user data script to configure the server and application code.
Activities
- Create IAM role with EC2 as a trusted entity with full access to S3 and DynamoDB.
- Set up an S3 bucket to serve images and static content and for for the web app to copy files to.
- Setup a DynamoDB table where the web app will write records to.
- Setup a VPC with a CIDR block, public subnet, internet gateway and a public route table allowing egress to the IGW and associate the route table with the public subnet.
- Launch an EC2 instance in the public subnet with a public IP and the IAM role, tags, and https security group.
- Configure a user-data shell script to prep the server and application code:
- install httpd24 and php56
- Download, unzip and deploy the web app and source files
- Download and install the AWS SDK for PHP
- Determine current region fetching the meta-data/placement/availability zone and instantiate a REGION variable
- Invoke AWS s3api to list buckets and instantiate a BUCKET variable
- Copy jquery and image source files to new S3 buckets and set public read ACLs using the BUCKET and REGION vars
- Inject the BUCKET and REGION variables into the PHP code using sed
- Populate DynamoDB tables with data from JSON source files
- Ensure httpd is configured to start automatically
- Start the httpd daemon
- Configure a user-data shell script to prep the server and application code:
#!/bin/bash
# Install Apache Web Server and PHP
yum remove -y httpd php
yum install -y httpd24 php56
# Download Lab files
wget https://us-west-2-aws-training.s3.amazonaws.com/awsu-ilt/AWS-100-ARC/v5.2/lab-1-webapp/scripts/lab1src.zip
unzip lab1src.zip -d /tmp/
mv /tmp/lab1src/*.php /var/www/html/
# Download and install the AWS SDK for PHP
wget https://github.com/aws/aws-sdk-php/releases/download/3.15.9/aws.zip
unzip aws -d /var/www/html
# Determine Region
AZ=`curl --silent http://169.254.169.254/latest/meta-data/placement/availability-zone/`
REGION=${AZ::-1}
# Copy files to Amazon S3 bucket with name webapp-*
BUCKET=`aws s3api list-buckets --query "Buckets[?starts_with(Name, 'webapp-')].Name | [0]" --output text`
aws s3 cp /tmp/lab1src/jquery/ s3://$BUCKET/jquery/ --recursive --acl public-read --region $REGION
aws s3 cp /tmp/lab1src/images/ s3://$BUCKET/images/ --recursive --acl public-read --region $REGION
aws s3 ls s3://$BUCKET/ --region $REGION --recursive
# Configure Region and Bucket to use
sed -i "2s/%region%/$REGION/g" /var/www/html/*.php
sed -i "3s/%bucket%/$BUCKET/g" /var/www/html/*.php
# Copy data into DynamoDB table
aws dynamodb batch-write-item --request-items file:///tmp/lab1src/scripts/services1.json --region $REGION
aws dynamodb batch-write-item --request-items file:///tmp/lab1src/scripts/services2.json --region $REGION
aws dynamodb batch-write-item --request-items file:///tmp/lab1src/scripts/services3.json --region $REGION
# Turn on web server
chkconfig httpd on
service httpd start
Resulting Architecture
I spend a fair bit of time on the water during the summer time around Cape Cod. Low tide is my family’s favorite time to be at the beach because the long sand flats are exposed and pristine beach sand is revealed. It’s lovely. To get to the beach at the right time, I need to know when the low tides are for a given day so we can plan to get the a good spot before everyone else does. I’ve used printed tide charts online, but that takes time to look up. What I needed was an Alexa skill to give me the tides for my favorite beaches. But there wasn’t one available for my region. So I made one called Cape Cod Tides.
I found an Alexa skill called Tide-Pooler on Github which had already worked out how to probe the NOAA API and get tides for major US harbors. I took this great code adapted it for my favorite harbors around Cape Cod, modified the code and slimmed down the data retrieved from NOAA and re-deployed it as my own toy. Now I can say “Alexa, give me the tides for Plymouth on Saturday” and it responds with the high and low tides of the day.
I suspect that there are many people on Cape Cod and around the area that will find this Alexa Skill to be useful enough to enable it in the Alexa Skills store so I plan to tidy it up a bit with support for a few more harbors and get it ready for placement sharing.
This is a quick story of my evolution to date of coding a Serverless application using AWS Lambda and how I went from n00b to 733t in 3 passes.
First Pass
My new Alexa skill needed a Lambda function written in Node.js to handle the Alexa requests. So I was manually copying/pasting my code from Sublime Text to the AWS Lambda console. What a time consuming pain in the butt. I was not doing any source control either. There had to be a better way.
Second Pass
I switched over to the Atom editor which has native GitHub integration with in it. This allowed me begin playing with source control on GitHub. After posting my repo up there and cloning it into my Atom environment, I was able to commit and push changes right from within Atom. Source control solved! But the nagging issue remained, how to expediently deploy my updates to Lambda?
Should I use AWS CodeStar, a custom CI/CD toolchain or other tooling to help stream line the workflow from coding to deployment in Lambda? So many options! Do I really need to explore all of the offerings out there to make it easier for me to update an Alexa skill that allows me to be a bit lazier? YES!
During exploring this issue, looking to solve this problem of efficient code deployment to Lambda, AWS held their annual Re:Invent conference during which they revealed the solution to me.
Third Pass
AWS to the rescue!! at Re:Invent2017 AWS announced Cloud9, a cloud based IDE that promises to make the lives of Serverless developers a lot easier. I’m not going to get into the details of what makes Cloud9 such a great offering, Werner Vogels and Clare Liguori have already done the introductions (see the video below).
But what I can tell you is that the tool has enabled me to:
- Clone my Github repo into my Cloud9 developer environment.
- Import my existing Lambda code for my Alexa Skill into my Cloud9 developer environment.
- Merge the Lambda code into a local git repo (in my Cloud9 terminal environment – so awesome!)
- Update my code using a super slick text editor with all the features you would expect from a fully decked out Sublime or Atom editor.
- Commit changes made to that code into my Github repo using the native Cloud9 terminal environment.
- Deploy the updated Lambda with a single click.
Deploying my updated Lambda code takes about 1 second and all I need to do is click one button.
Did AWS just make this process this easy? I mean I have to be doing something wrong here. It can’t be this easy! For a n00b! What am I missing here?
This is just the sauce that my Skill needed. Thank you AWS!
The AWS CLI is a handy and extremely powerful tool for managing resources on AWS from a local shell. In this post we will walk through the process of setting up the AWS CLI on a Linux Machine ( I use the Linux Subsystem on Windows which gives me an Ubuntu bash). Then we begin using the AWS CLI to perform administrative tasks on the environment.
What you need
- AWS Account
- AWS IAM User with the correct permissions to administer EC2
- The Access keys of said AWS IAM User with the correct permissions
- Linux
- AWS CLI
Lets get started…
I need to SSH regularly into Linux machines on AWS. I want to just hop over into a CLI and SSH on over to my instance from my Windows 10 machine but the common way of doing so is to configure and launch PuTTy to establish the SSH session.
I like PuTTy, but there are a few too many steps required to set up a connection to a Linux instance, especially when those instances are ephemeral. For example the keys provided by AWS need to be converted to .PPK which is time consuming, I just want to use the .PEM key AWS provides without having to convert the keys. More time is needed to configure PuTTy to use the keys and then define the connection parameters. I wanted fewer steps to connecting into my Linux instances.
Microsoft offers the Windows Subsystem for Linux which has given me the Ubuntu Bash shell within Windows and it is pretty handy. Now I have a native SSH client that shaves a few clicks of establishing connections. I’ll walk through some of the keys steps to show you how I simplify my connections. In fact, on its own, having a native SSH in Windows is worth installing the Windows Subsystem for Linux.
Let’s get started..
The Elastic Load Balancer helps ensure traffic is evenly distributed across servers. Very helpful when dealing with high traffic loads and potential denial of service conditions whether accidental or intentional. AWS ELB comes in three flavors, Application Load Balancer ALB, Network Load Balancer NLB, and the Classic Elastic Load Balancer.
With the AWS ELB service, inbound traffic is distributed to multiple EC2 instances in a group. Without the ELB in place, traffic can end up hitting only one instance, increasing the likelihood of experiencing traffic beyond their capacity to handle it. An affected service could suffer a Denial of Service (DoS) when overloaded with traffic. ELBs help mitigate this be smartly distributing the traffic across healthy nodes. This helps to increase fault tolerance, or the system’s ability to recover from performance degradation and failures.